The terms “Knitter” or “Crocheter” are not mutually exclusive. And I know I’m not the only yarnie who also knows her way around a loom in addition to making loops with sticks. Sometimes it’s just about what are the right tools for the job! So if you’re a resourceful, jack-of-all-trades yarn person such as myself, you might wonder which of your beloved crafts to us to make an i-cord.
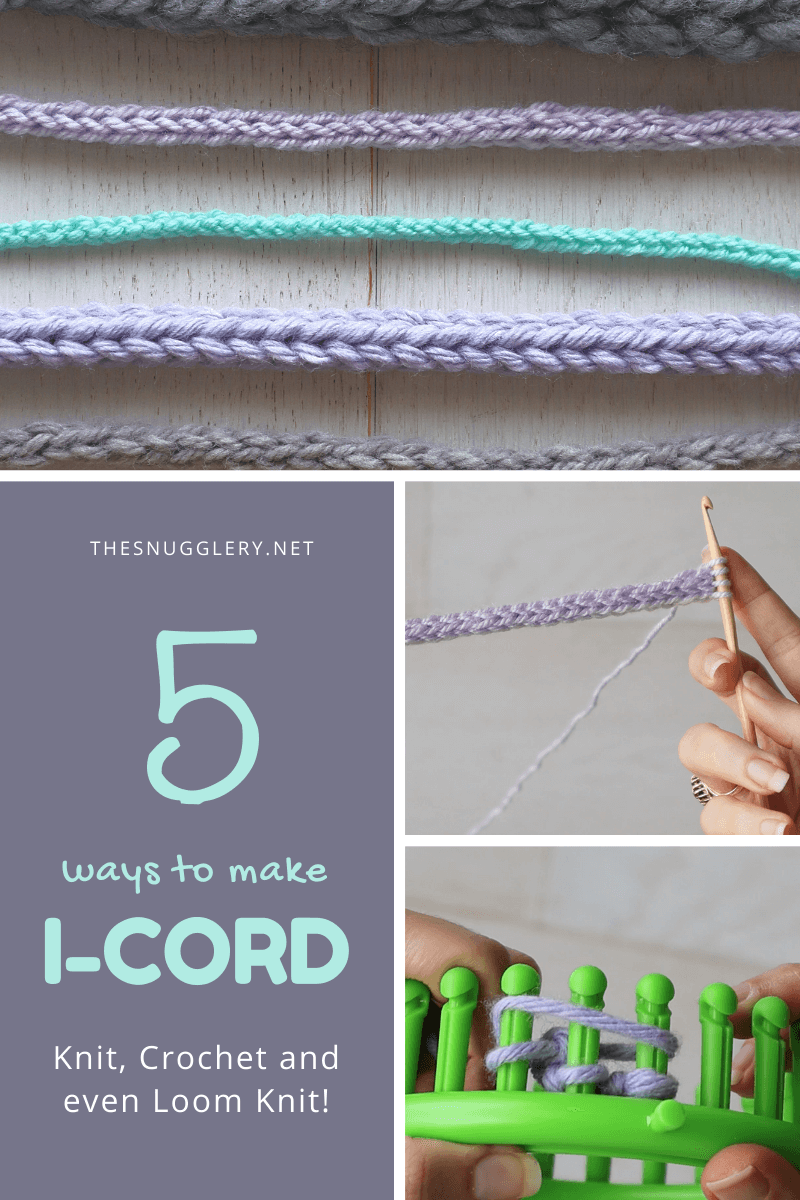
An i-cord is a sturdy, simple tube of essentially 4 knit stitches. It has infinite applications from handles, to straps to jewelry. And, believe it or not, you can make an i-cord with knitting, crochet AND loom knitting. So let’s review 5 of those i-cord making methods today!
If you’re a visual learner, you might enjoy my YouTube video on the subject:
1. Knit flat i-cord
The most basic way to knit an i-cord is to cast on a small number of stitches (typically 3-4) and knit them.

Then, without turning your work, slip the stitches knitwise back onto your left needle.
With your working yarn coming from the last stitch, bring it around the back of your work to knit the first stitch. The knit all remaining stitches in order.
Repeat that over and over again to knit an i-cord!

2. I-cord knit with double pointed or circular needles
The slightly quicker cousin of the first version, you’ll cast on and knit the same way.
But rather than slipping your stitches back onto the left needle, all you have to do is slide the stitches to the other end of the needle. That’s why you’ll need DPNs or circulars for this method.


Then you’ll see the familiar configuration with your working yarn coming off the last stitch. You can knit the first stitch with that working yarn in back just like before. Then slide the stitches to the opposite end of your needles again to repeat the process.

3. Crochet i-cord
It looks like knitting but you can actually crochet an i-cord (a couple ways). One way is to chain 3-4 chains. Skip the 1st chain and insert your hook into the 2nd chain and pull up a loop. Then insert your hook into the next chain and pull up a loop. Repeat for however many chains you made.

Then, slip all but the first loop off your hook. You can hold the live loops in-between your fingers to make sure they don’t slip out.
Then, bringing your working yarn around the back to pull up a loop through the loop on your hook. Insert your hook into the next live loop and pull up a loop through that one. Repeat for all the live loops.

Then repeat the process over and over to crochet an i-cord. It’s a little scary to let loops drop off your hook like that but if you pinch them between your fingers, you shouldn’t lose any. And, if you’re skilled with a crochet hook, it can be a pretty quick way to make an i-cord.
4. Crochet with the tail
This is kind of a sneaky i-cord hack. You can only make about a 2-3 stitch wide i-cord this way but it is absolutely the fastest of all the methods!
You’ll want to pull a long tail, about 3 times longer than you want your i-cord to be. Make a slip knot and chain one. Then bring your tail yarn up and over your hook. With two loops on your hook, yarn over with the working yarn and pull through both loops.


Repeat.
Yarn over (from front to back) with the yarn tail. Yarn over with working yarn and pull through two loops.
Repeat that over and over and you’ll have a convincing looking i-cord faster than you ever thought you could!
5. Loom knit i-cord
True, there are specifically i-cord knitters out there. They’re usually called spool knitters, french knitters or there’s even a hand cranked one called “The Embellish-Knit” that I actually used to have but can’t find for the life of me.
Those are great devices to use to make an i-cord but I thought “use an i-cord maker to make an i-cord” was kind of obvious. So I’m gonna show you how you can make an i-cord on a regular round loom of any size!

Cast on 3-4 stitches using any method you like. Then bring your working yarn around the back of all your pegs, and wrap it over the front of all your pegs and knit.
Repeat over and over again, making sure to wrap your yarn all the way around all the pegs at once, like a little oval.

When you bind off, it won’t look exactly like an i-cord. If you see ladders up the sides, just tug on either end of your i-cord and the stitches should even out and round out into the familiar i-cord shape.

There you have it! 5 ways to make an i-cord with needles, crochet hooks and even a loom! Try them all and see which method suits you best.